

How To Extract Aar File In Windows
An Android library is structurally the aforementioned as an Android app module. Information technology can include everything needed to build an app, including source code, resource files, and an Android manifest. However, instead of compiling into an APK that runs on a device, an Android library compiles into an Android Archive (AAR) file that you can use as a dependency for an Android app module. Unlike JAR files, AAR files offer the following functionality for Android applications:
- AAR files can contain Android resources and a manifest file, which allows y'all to parcel in shared resources like layouts and drawables in addition to Java classes and methods.
- AAR files can incorporate C/C++ libraries for use by the app module's C/C++ code.
A library module is useful in the following situations:
- When you're building multiple apps that utilise some of the aforementioned components, such as activities, services, or UI layouts.
- When you're building an app that exists in multiple APK variations, such equally a free and paid version and yous need the same core components in both.
In either case, simply move the files you want to reuse into a library module then add the library equally a dependency for each app module. This folio teaches you lot how to do both.
Create a library module
To create a new library module in your projection, continue as follows:
- Click File > New > New Module.
- In the Create New Module window that appears, click Android Library, so click Next.
There's likewise an option to create a Java Library, which builds a traditional JAR file. While a JAR file is useful for many projects— especially when you desire to share code with other platforms—it does not permit yous to include Android resource or manifest files, which is very useful for code reuse in Android projects. And then this guide focuses on creating Android libraries.
- Requite your library a name and select a minimum SDK version for the code in the library, then click Finish.
Once the Gradle project sync completes, the library module appears in the Project panel on the left. If you lot don't run into the new module folder, make sure information technology'due south displaying the Android view.
Catechumen an app module to a library module
If you have an existing app module with all the code y'all desire to reuse, y'all can turn it into a library module as follows:
- Open the module-level
build.gradlefile. - Delete the line for the
applicationId. Only an Android app module can define this. - At the superlative of the file, you should see the post-obit:
Swell
plugins { id 'com.android.application' }Kotlin
plugins { id("com.android.awarding") }Change it to the following:
Groovy
plugins { id 'com.android.library' }Kotlin
plugins { id("com.android.library") } - Save the file and click File > Sync Project with Gradle Files.
That's it. The entire structure of the module remains the same, but it now operates as an Android library and the build volition now create an AAR file instead of an APK.
When you lot want to build the AAR file, select the library module in the Project window and then click Build> Build APK.
Calculation dependencies with the Project Structure Dialog
Use your library from inside the same projection
To use your new Android library's code in another app or library module within the same project, add together a projection-level dependency:
- Navigate to File> Project Structure> Dependencies.
- Select the Module in which you'll use the library.
- In the Declared Dependencies tab, click
 and select Module Dependency in the dropdown.
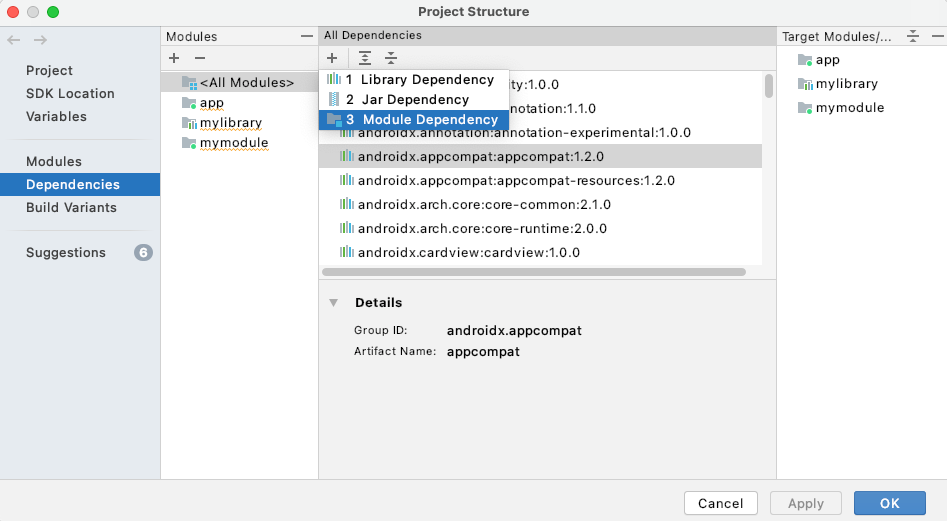
-
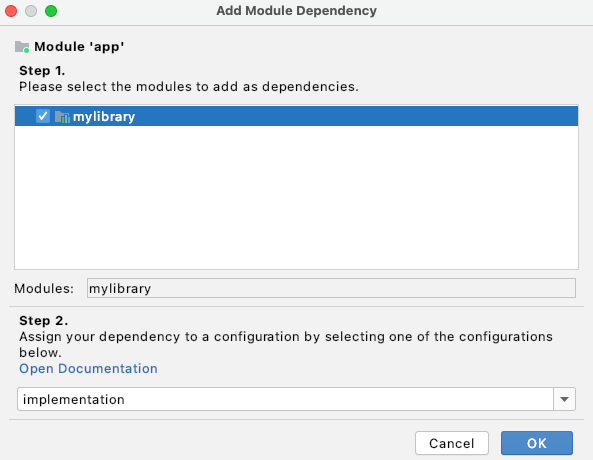
In the Add together Module Dependency dialog, select your library module.
-
Select the configuration that requires this dependency, or select "implementation" if information technology applies to all configurations, and click OK.
Studio volition edit your modules's build.gradle file to add the dependency of the form:
implementation(projection(path: ":example-library"))
Use your library in other projects
The recommended fashion to share dependencies (JARs and AARs) is with a Maven repository, either hosted on a service such every bit Maven Primal or with a directory structure on your local deejay. For more data on using Maven repositories, encounter Remote repositories.
When an Android library is published to a Maven repository, metadata is included so that the dependencies of the library are included in the consuming build, which allows the library to be automatically deduplicated if it is used in multiple places.
To use your Android library's code in another app module, proceed equally follows:
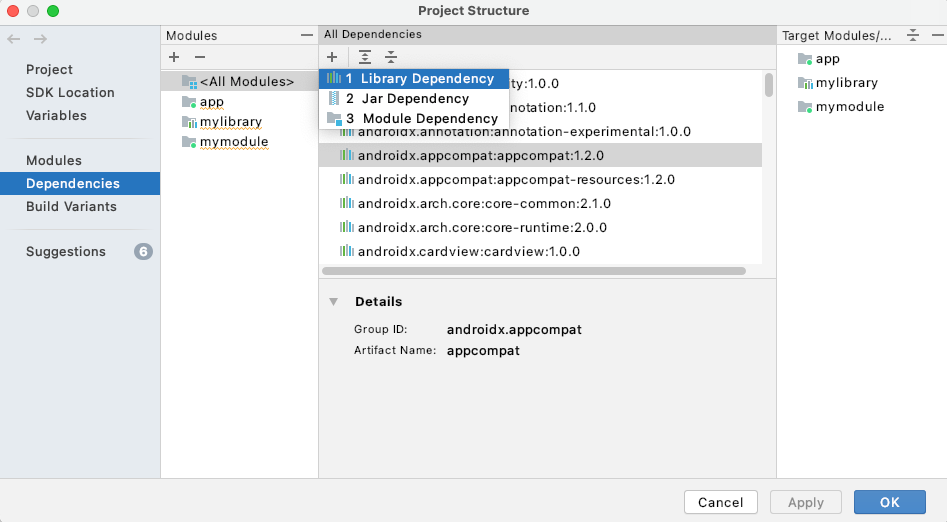
- Navigate to File> Project Construction> Dependencies.
- In the Declared Dependencies tab, click and select Library Dependency in the dropdown.
-
In the Add Library Dependency dialog, use the search box to find the library to add. This form searches the repositories specified in the in the
dependencyResolutionManagement { repositories {...}}block in thesettings.gradlefile.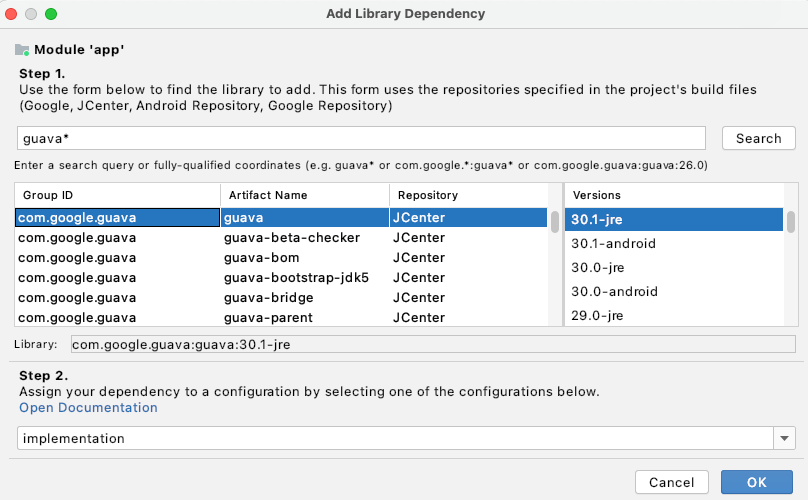
-
Select the configuration that requires this dependency, or select "implementation" if it applies to all configurations.
-
Check your app'southward
build.gradlefile to ostend a declaration like to the following (depending on the build configuration yous've selected):
implementation 'com.example:examplelibrary:1.0.0' Add together your AAR or JAR as a dependency
To use your Android library's code in another app module, continue as follows:
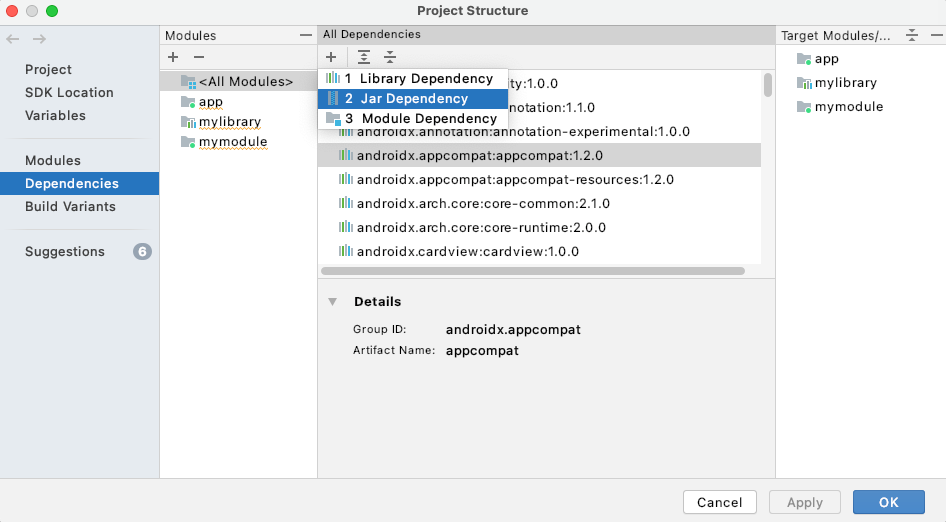
- Navigate to File> Project Construction> Dependencies.
- In the Alleged Dependencies tab, click and select Jar Dependency in the dropdown.
-
In the Add Jar/Aar Dependency dialog, first enter the path to your
.aaror.jarfile, so select the configuration to which the dependency applies. If the library should be available to all configurations, select the "implementation" configuration.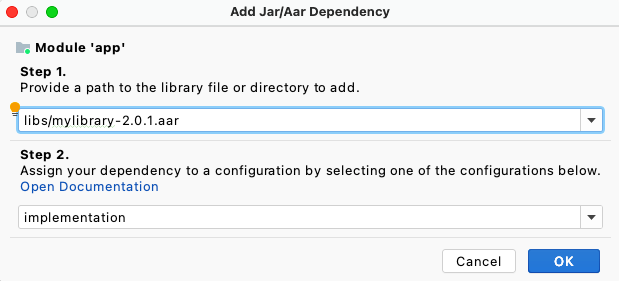
-
Check your app's
build.gradlefile to confirm a declaration similar to the following (depending on the build configuration you've selected):implementation files('my_path/my_lib.aar')
Alternatively, if y'all're running Gradle builds outside of Android Studio, it'southward possible to import a dependency by adding a path to the dependency in your app's build.gradle file. For case:
dependencies { implementation fileTree(dir: "libs", include: ["*.jar", "*.aar"]) ... } For more about adding Gradle dependencies, run into Add build dependencies.
Choose resource to brand public
All resources in a library default to public. To make all resource implicitly private, you lot must define at least one specific aspect equally public. Resource include all files in your project's res/ directory, such as images. To prevent users of your library from accessing resources intended only for internal use, y'all should use this automatic private designation mechanism by declaring one or more public resources. Alternately, y'all tin can make all resources private by calculation an empty <public /> tag , which marks nothing equally public, which makes everything else (all resources) private.
To declare a public resources, add a <public> declaration to your library's public.xml file. If yous haven't added public resources before, you lot need to create the public.xml file in the res/values/ directory of your library.
The following example code creates two public string resource with the names mylib_app_name and mylib_public_string:
<resource> <public proper name="mylib_app_name" type="string"/> <public proper name="mylib_public_string" type="cord"/> </resource>
You lot should make public any resources that you want to remain visible to developers using your library.
Implicitly making attributes private non just prevents users of your library from experiencing lawmaking completion suggestions from internal library resources only too allows you lot to rename or remove private resources without breaking clients of your library. Private resources are filtered out of lawmaking completion, and Lint warns you when you endeavor to reference a private resource.
When building a library, the Android Gradle plugin gets the public resource definitions and extracts them into the public.txt file, which is then packaged inside the AAR file.
Development considerations for library modules
As you develop your library modules and dependent apps, be aware of the following behaviors and limitations.
Once yous have added references to library modules to your Android app module, you can gear up their relative priority. At build time, the libraries are merged with the app ane at a time, starting from the lowest priority to the highest.
-
Resource merge conflicts
The build tools merge resources from a library module with those of a dependent app module. If a given resource ID is defined in both modules, the resources from the app is used.
If conflicts occur between multiple AAR libraries, then the resource from the library listed starting time in the dependencies list (toward the top of the
dependenciescake) is used.To avoid resource conflicts for mutual resource IDs, consider using a prefix or other consequent naming scheme that is unique to the module (or is unique across all project modules).
-
In multi-module builds, JAR dependencies are treated equally transitive dependencies
When you lot add together a JAR dependency to a library project that outputs an AAR, the JAR is processed past the library module and packaged with its AAR.
All the same, if your project includes a library module that is consumed by an app module, the app module treats the library's local JAR dependency as a transitive dependency. In this case, the local JAR is processed by the app module that consumes it, and not by the library module. This is to speed up incremental builds that are caused by changes to a library'due south code.
Any Java resource conflicts caused past local JAR dependencies must be resolved in the app module that consumes the library.
-
A library module can depend on an external JAR library
You lot can develop a library module that depends on an external library. (for example, the Maps external library). In this case, the dependent app must build confronting a target that includes the external library (for case, the Google APIs Add together-On). Note likewise that both the library module and the dependent app must declare the external library in their manifest files, in a
<uses-library>element. -
The app module's
minSdkVersionmust be equal to or greater than the version divers by the libraryA library is compiled as function of the dependent app module, so the APIs used in the library module must be uniform with the platform version that the app module supports.
-
Each library module creates its own R class
When you build the dependent app modules, library modules are compiled into an AAR file then added to the app module. Therefore, each library has its own
Rcourse, named according to the library'due south bundle proper name. TheRclass generated from main module and the library module is created in all the packages that are needed including the main module's package and the libraries' packages. -
A library module may include its own ProGuard configuration file
If you take a library project that you utilize to build and publish an AAR, you tin add a ProGuard configuration file to your library's build configuration and the Android Gradle plugin applies the ProGuard rules that you have specified. The build tools embed this file inside the generated AAR file for the library module. When you add together the library to an app module, the library's ProGuard file gets appended to the ProGuard configuration file (
proguard.txt) of the app module.Past embedding a ProGuard file in your library module, yous ensure that app modules that depend on your library do not have to manually update their ProGuard files to use your library. When the Android Studio build organization builds your app, it uses the directives from both the app module and the library. So, there'due south no need to run a code shrinker on the library in a carve up step.
To add together the ProGuard rules to your library project, you must specify the file's name with
consumerProguardFilesholding, within thedefaultConfigblock of your library'southbuild.gradlefile. For example, the post-obit snippet setslib-proguard-rules.txtequally the library's ProGuard configuration file:Groovy
android { defaultConfig { consumerProguardFiles 'lib-proguard-rules.txt' } ... }Kotlin
android { defaultConfig { consumerProguardFiles("lib-proguard-rules.txt") } ... }However, if your library module is a function of a multi-module build that compiles into an APK and does not generate an AAR, you should run code shrinking on only the app module that consumes the library. To larn more about ProGuard rules and their usage, read Compress, obfuscate, and optimize your app.
-
Testing a library module is the same as testing an app
The main divergence is that the library and its dependencies are automatically included as dependencies of the test APK. This ways that the examination APK includes not merely its own code, but also the library's AAR and all its dependencies. Because at that place is no separate "app under test," the
androidTestjob installs (and uninstalls) only the test APK.When merging multiple manifest files, Gradle follows the default priority order and merges the library'due south manifest into the test APK'southward chief manifest.
Anatomy of an AAR file
The file extension for an AAR file is .aar, and the Maven artifact type should be aar every bit well. The file itself is a zip file. The only mandatory entry is /AndroidManifest.xml.
Additionally, an AAR file may include one or more of the following optional entries:
-
/classes.jar -
/res/ -
/R.txt -
/public.txt -
/assets/ -
/libs/name.jar -
/jni/abi_name/proper noun.so(where abi_name is one of the Android supported ABIs) -
/proguard.txt -
/lint.jar -
/api.jar -
/prefab/for exporting native libraries
Source: https://developer.android.com/studio/projects/android-library
Posted by: emerydespassoling.blogspot.com
0 Response to "How To Extract Aar File In Windows"
Post a Comment